

On October 12, a new simulator owner named James watched his $4,000 investment shake as his neighbor walked across the floor above. He quickly learned that the foundation of a premium experience isn't just the software, but the strength of the projector mounts holding the vision together. You've likely felt that same flicker of worry about a universal bracket failing or your expensive equipment falling from the ceiling. It's a common fear when you're building a sanctuary for your game.
It's natural to want a setup that looks as seamless as a professional tour bay without the headache of technical jargon. We'll show you how to select the ideal hardware to secure your equipment and deliver a flawless, high-definition image every time you step up to the tee. This guide simplifies the process by walking you through how to measure your space for a bespoke fit. You'll gain the confidence to choose a mount that ensures an elite, turnkey result for your home golfing experience.
Gaining confidence in your technical setup is a great start to your improvement journey. For those who also want to boost their confidence in communication, you can check out English Explorer to find structured English language courses in Singapore for all proficiency levels.
Key Takeaways
- Learn why choosing high-quality projector mounts is the first step in protecting your investment and ensuring a steady, professional image.
- Discover how to use simple adjustments like "pitch" and "roll" to perfectly align your virtual fairway for a seamless playing experience.
- Compare the benefits of ceiling and wall placements to ensure your equipment stays completely out of your swing path.
- Identify the specific weight and support features needed to safely hold premium 4K laser projectors in your home sanctuary.
- Master the basics of a secure installation by learning how to properly anchor your hardware for a turnkey, worry-free setup.
What is a Projector Mount and Why Does Quality Matter?
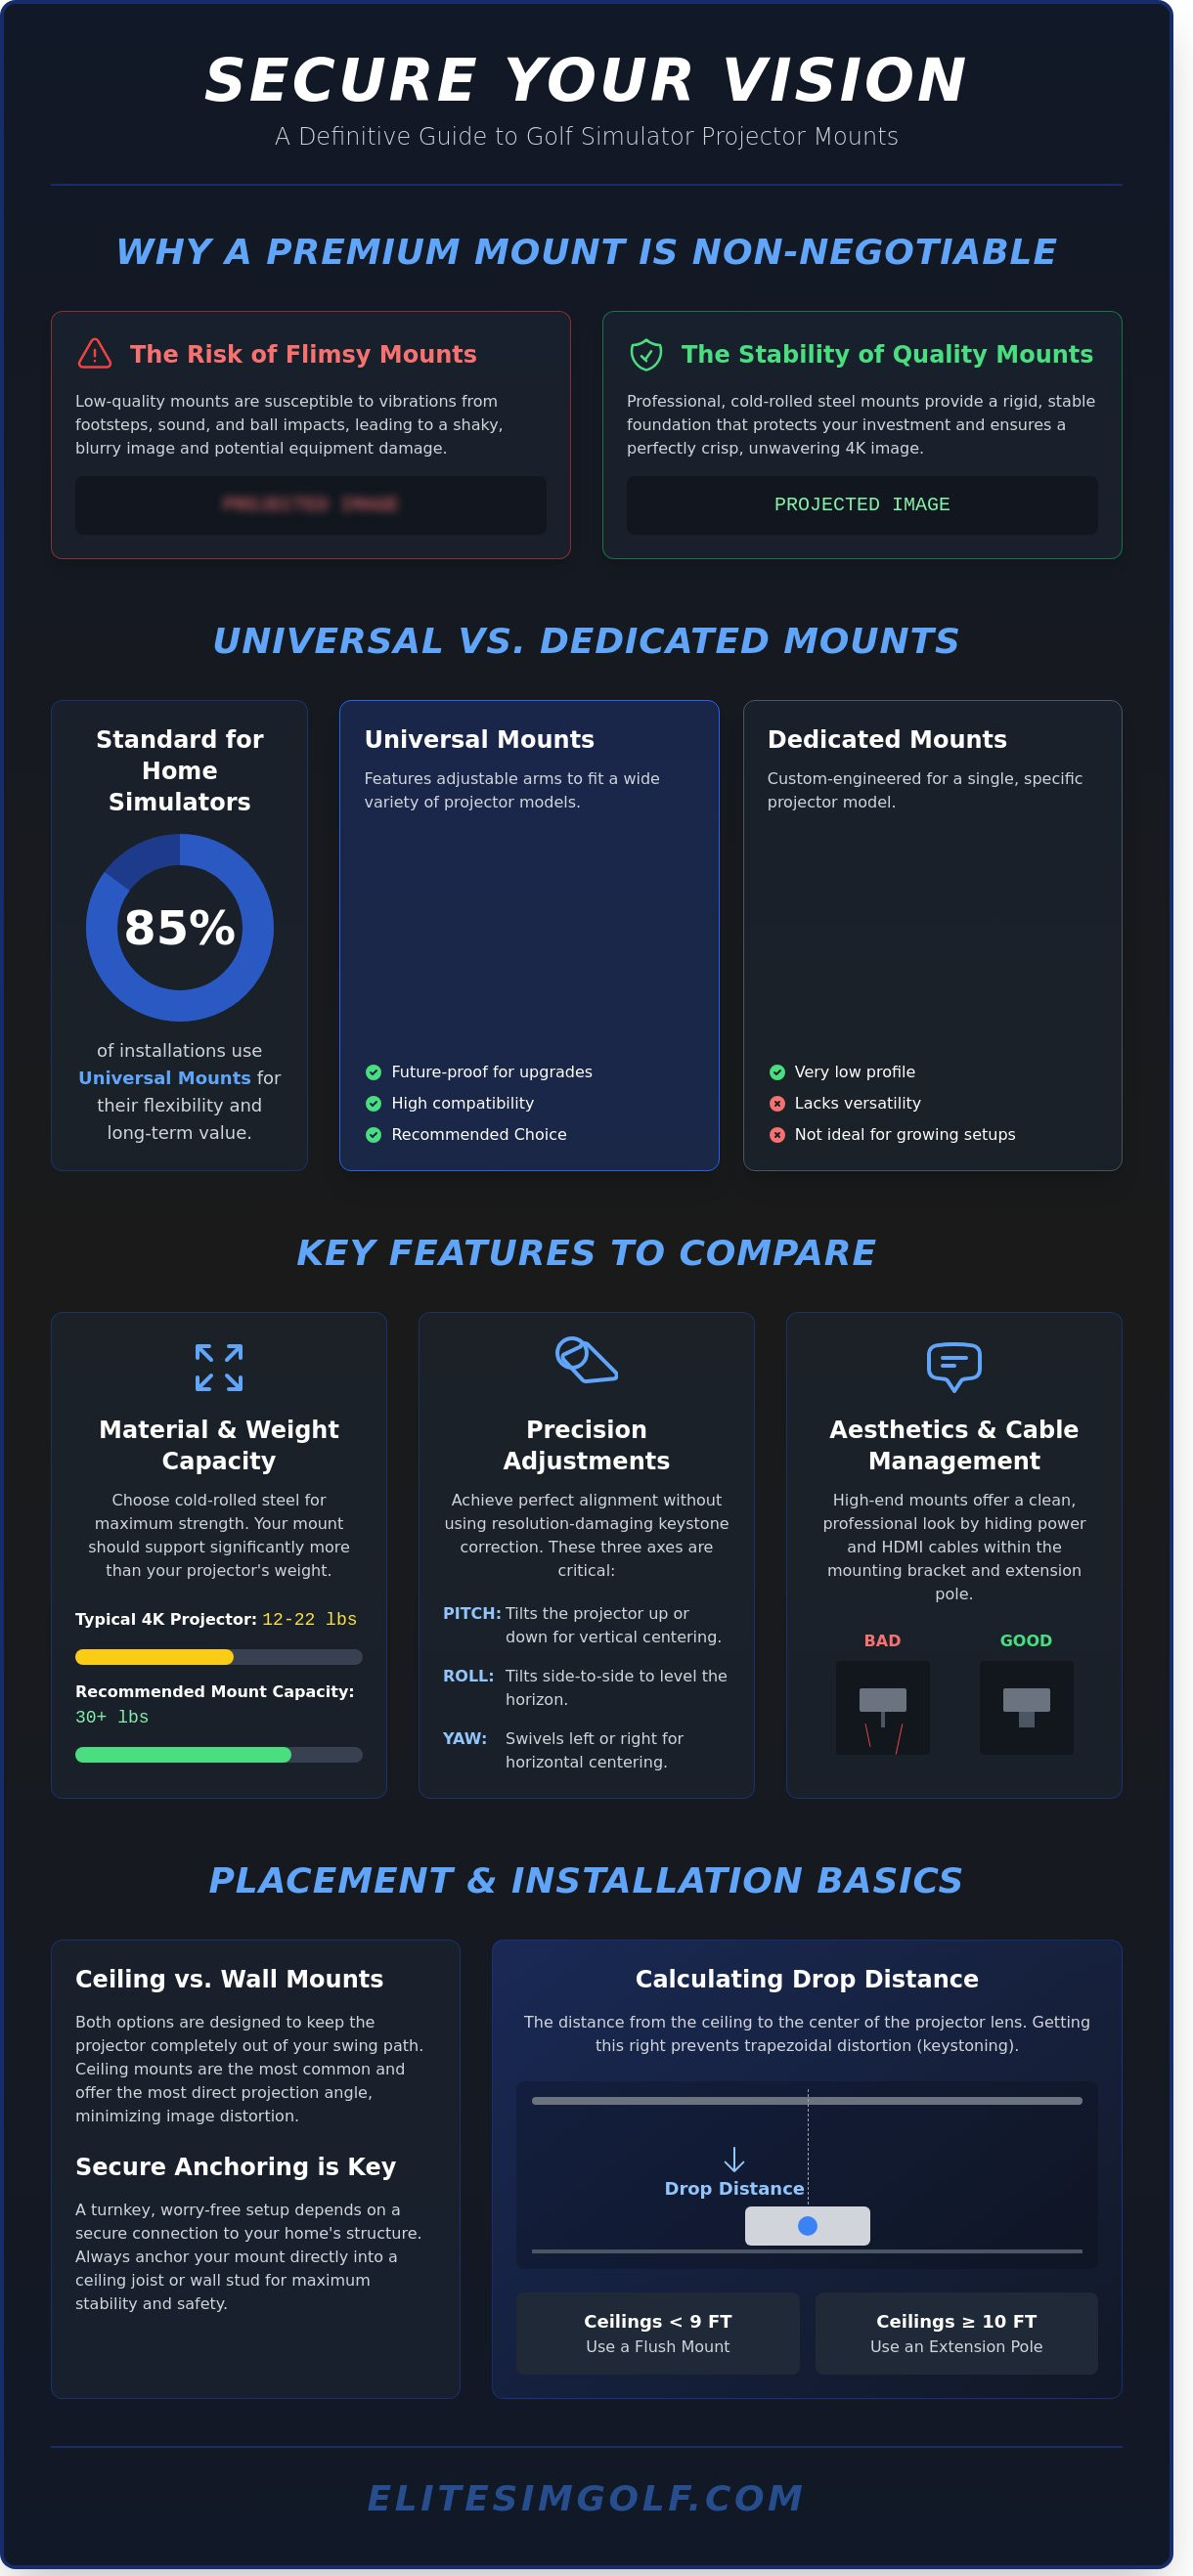
A projector mount is a specialized metal bracket designed to secure your projector to a ceiling or wall. Think of it as the foundation of your entire visual experience. In a premium golf simulator, this piece of hardware does much more than just hold a device. It ensures your expensive investment stays safe and perfectly still. Most high-quality projectors weigh between 15 and 35 pounds. A failure in the mounting system could result in thousands of dollars in damage. Choosing the right hardware is the first step toward a turnkey installation that protects your equipment.
Quality matters because golf simulators are high-impact environments. When you hit a golf ball at speeds exceeding 150 miles per hour into an impact screen, it creates a significant displacement of air. This movement, combined with floor vibrations from your swing, can cause a flimsy mount to shake. Even a tiny vibration at the source leads to a blurry image on your screen. Using professional projector mounts provides a rigid, stable connection that keeps your 4K image crisp. It also offers an elite look by hiding unsightly power cables and HDMI cords inside the neck of the bracket. This creates a bespoke, clean finish for your home sanctuary.
This principle of creating a high-quality "home sanctuary" is a cornerstone of modern luxury living. For those inspired by this concept, you can learn more about premier residential developments.
Universal vs. Dedicated Mounts
Universal mounts are the standard choice for 85 percent of home simulator installations. These units feature adjustable arms that can reach the different mounting holes found on various projector brands. This flexibility is vital. If you decide to upgrade your hardware in three years, a universal mount will likely still work with your new device. Dedicated mounts are custom-engineered for one specific model. While they offer a very low profile, they lack the versatility needed for a growing home setup. We recommend universal options because they offer the best long-term value for your premium investment.
The Role of Mounts in Image Alignment
Your mount is the primary tool used to line up the picture with your screen. Adjustable mounts allow you to tilt, roll, and turn the projector manually. This physical adjustment is much better than using "keystone correction." Keystone is a software setting that digitally squashes the image to make it look rectangular. However, this process reduces your resolution and can make the grass in your simulation look jagged. A fixed mount stays in one permanent position once installed. An adjustable mount gives you the freedom to fine-tune the image until it's perfect. This ensures an unrivaled, professional display every time you step up to the tee.
Key Features to Compare Before You Buy
Your golf simulator is an elite investment in your game. To protect that investment, you need a stable foundation. High-quality projector mounts ensure your image stays crisp and centered, even when the air pressure from a 160-mph golf ball impact shakes the room. Start by checking the material quality. Professional installers prefer cold-rolled steel. It's significantly stronger than basic aluminum and resists bending under constant weight. This durability is vital for a seamless, turnkey experience that lasts for years. The same principle of using specialized, durable components applies to industrial machinery, and for those interested in high-performance plastic guide rails and parts, you can check out Slideways, Inc..
This commitment to building a premier home training environment often extends beyond golf. If you're looking to add other high-quality equipment to your space, you can learn more about Gym Pros and their selection of new and used fitness machines.
Weight capacity is your first technical hurdle. Most premium 4K projectors used in home builds weigh between 12 and 22 pounds. You should choose a mount that is rated to support at least 30 pounds. This provides a necessary safety buffer. A mount that's too weak will sag over time. This causes the image to drift off the screen, ruining your immersion. Precision is everything in a high-end setup. If you're looking for a completely integrated system, you might also consider how your visuals pair with a vtrack overhead golf launch monitor to create a truly professional training environment.
The dedication to building a professional training environment with cutting-edge tech is a mindset that translates to many ambitious career paths. For those looking to enter elite technological fields, for instance, it's crucial to explore Technical Preparation Course to get a competitive edge.
Understanding Pitch, Roll, and Yaw
Fine-tuning the image is where you achieve mastery over your space. You don't want to move your ceiling bolts to fix a crooked image. Instead, you want a mount with three-axis adjustment. These movements allow for total control over the lens position:
- Pitch: This tilts the projector up or down. It helps you hit the vertical center of your impact screen perfectly.
- Roll: This tilts the projector side-to-side. It ensures your horizon is level so the virtual fairway doesn't look like it's on a slant.
- Yaw: This swivels the projector left or right. It centers the image horizontally without needing to unmount the hardware.
Calculating Your Required Drop Distance
Drop distance is the measurement from your ceiling to the center of the projector lens. Accuracy here prevents "keystoning," which is when your image looks like a trapezoid instead of a square. For standard ceilings under 9 feet tall, a flush mount is the best choice. It keeps the equipment high and safely away from your swing path. If your ceilings are 10 feet or higher, you'll need an extension pole. These poles often come in 6-inch or 12-inch increments to bring the projector down to the correct height. Always measure from the ceiling to the top edge of your impact screen to find your target placement.
Selecting the right hardware transforms a simple room into a bespoke training ground. If you're ready to upgrade your installation with unrivaled stability, you can browse our curated selection of professional projector mounts to find the perfect fit for your home.
Ceiling Mounts vs. Wall Mounts: Which Is Right for You?
Deciding where to install your equipment is a pivotal moment in your journey toward a professional home setup. The choice between ceiling and wall projector mounts often depends on the layout of your room and your specific goals for the space. You want a solution that feels bespoke and integrated, rather than something that looks like an afterthought. Most high-end installations prioritize a clean look that mimics a real day at the course. This choice impacts everything from your swing safety to the clarity of the image on your impact screen.
The Benefits of Ceiling Mounting
Ceiling mounts are the gold standard for a reason. They keep your hardware completely out of the swing path, which is vital when you're moving a club at high speeds. By placing the projector directly above or slightly behind the golfer, you ensure a perfectly centered image. This position prevents your body from casting shadows on the screen, which is a common issue in smaller rooms. It's a seamless way to create an immersive environment that feels like a premium private club.
A ceiling installation also allows for better integration with other high-end technology. It pairs perfectly with an overhead golf launch monitor to create a unified tech hub above your hitting area. This "elite" configuration keeps the floor clear of cables and trip hazards. It's the ideal choice for a permanent, turnkey simulator room where aesthetics and performance are equally important. You'll enjoy a professional look that transforms your home into a sanctuary for improvement.
This same drive for improvement and creating an elite environment for skill development is mirrored in the professional world. For those seeking to advance their careers through comprehensive training, institutions like Trainetics Academy provide the structured programs needed to achieve new levels of expertise.
Similarly, for those who wish to extend this commitment to learning into the realm of communication, Learning Explorer offers professional language courses that empower individuals to connect across cultures with clarity and precision.
When to Consider a Wall Mount
Wall mounts are a practical alternative for specific room challenges. You might find them useful in a garage setup where a garage door opener or tracks block the center of the ceiling. They're also a great choice for rooms with vaulted or extremely high ceilings that make a standard drop-pole mount difficult to stabilize. Many homeowners find wall installations easier because they don't require drilling into ceiling joists, which can be a complex task for a beginner.
However, wall-mounted projector mounts do have some limitations you should consider. If the projector is mounted on a back wall, you must ensure it's high enough so that your head doesn't block the light beam. Shadows can break the immersion of the game and make it harder to focus on your target. To avoid this, you may need a projector with a specific "throw ratio" that allows it to sit further back while still filling the screen.
Safety and tech compatibility are the final pieces of the puzzle. You must establish a safety zone to protect your lens. We recommend keeping your mount at least 10 to 12 feet away from the screen. This distance helps avoid "skyed" balls, which are shots that fly almost straight up off the top of the club head. Additionally, ensure your mount doesn't block the view of your overhead sensors. These sensors need a clear line of sight to the ball to provide the unrivaled data accuracy you expect from a premium system.
- Check for ceiling obstructions like fans or lights before drilling.
- Ensure the wall or ceiling can support the weight of the hardware.
- Use a mount with "fine-tune" adjustments to level the image perfectly.
Top Picks from Our Projector Mount Collection
Choosing the right hardware is the final step in securing your dream setup. A high-quality mount does more than just hold equipment; it preserves the precision of your golf simulator. We have curated a selection of projector mounts designed to meet the demands of every room, from tight basement builds to expansive luxury suites.
This attention to detail in creating a premium environment at home often extends to travel and leisure. For those who seek the same level of curated luxury on vacation, a full-service concierge like GAAM Ibiza can arrange similar high-end experiences, from private villas to yachts.
This same commitment to excellence can be applied to your vehicle as well; for enthusiasts looking to upgrade their ride with high-quality components, MTX Performance provides an extensive selection of automotive parts and accessories.
To complete your premium home environment with high-end furnishings and sustainable fine jewelry, luxemarket.online offers a curated selection of luxury goods that align with a sophisticated lifestyle.
For those looking to further enhance the aesthetic of their simulator space with custom mirrors for swing analysis or sleek glass partitions, Jeske Glass provides bespoke glass services that define modern luxury living; similarly, for professionals wanting to project that same quality in their business displays, Coker Exhibition Systems Ltd (CokerExpo) offers insights on illuminating your brand with premium exhibition lightboxes.
For those who extend this passion for high-end production to their music, achieving a world-class sound with professional strings is now possible through remote collaboration; you can learn more about how an online studio can bring elite production quality to your tracks.
Best for Most Users: The Universal Ceiling Mount
The universal ceiling mount is the standard for a reason. It offers unrivaled versatility for golfers who want a professional look without a complex installation. These mounts feature adjustable arms that reach the mounting holes on almost any projector brand. They are built to be sturdy. Most models in our collection support up to 50 lbs, which provides a massive safety margin for standard home projectors.
Maintenance is simple with the quick-release feature. This design allows you to click the projector out of the bracket in under 60 seconds. You can clean your dust filters or check cables without losing your alignment settings. For anyone spending $1,000 or more on a projector, this mount is a smart investment. It protects your technology while keeping your ceiling looking clean and bespoke.
- Supports up to 50 lbs for maximum safety.
- Quick-release mechanism for effortless maintenance.
- Adjustable arms fit 95 percent of consumer projectors.
Heavy-Duty Support for 4K Performance
Elite simulators often utilize premium 4K laser projectors like the BenQ LK936ST. These units offer incredible clarity, but they are significantly heavier than entry-level models. You need a heavy-duty mount to prevent image vibration. If the mount moves even a fraction of an inch, your 4K image will lose its sharpness. Our heavy-duty options use reinforced steel plates to ensure your picture stays locked in place, providing a seamless visual experience every time you tee off.
Specialty Solutions: Flush Mounts and Extensions
Every room has different needs. In basement simulators, every inch of height matters. A flush mount is the perfect solution for ceilings under 9 feet. These projector mounts sit nearly flat against the ceiling, saving about 6 inches of vertical space compared to standard brackets. This keeps the equipment safely away from your backswing.
If you have a vaulted ceiling or a height of 12 feet or more, you will need a telescoping extension kit. These kits allow you to drop the projector down to the ideal "strike zone" for your screen. You won't need to hire a fabricator for a custom solution. Our kits adjust in 1-inch increments to give you the perfect angle. You can choose between matte black or gloss white finishes to ensure the hardware blends into your home decor perfectly.
Your equipment deserves a stable foundation. Explore our full range of premium projector mounts to find the perfect fit for your home sanctuary.
Installation Basics: Getting Your Mount Set Up
Transforming your room into a high-end golf sanctuary requires a precise installation. This final stage is where your vision truly comes to life. To ensure a professional finish, you must start by locating your ceiling joists or wall studs. These are the thick wooden frames behind your walls that provide structural support. You should never mount your equipment to just the drywall. Drywall is essentially pressed plaster and paper; it cannot safely support the weight of professional projector mounts over time. Using a stud finder ensures your simulator remains secure for years of play. A secure installation is the first step toward golf without limits.
Before you climb the ladder, attach the projector plate to your hardware on a stable table or workbench. It's much easier to align screws and brackets while the device is at waist height. Once the plate is firm, you can prepare the main bracket for the ceiling. Use heavy-duty lag bolts for this task. These are thick, industrial screws that bite deep into the wooden joists. This creates a rock-solid connection that prevents the projector from shaking or shifting when you hit a ball into the screen. Your dream, realized.
Connect the two pieces by lifting the projector into the ceiling bracket. At this stage, only tighten the bolts by hand. Keeping them slightly loose allows you to make micro-adjustments to the angle. This flexibility is essential for getting your image perfectly square before you perform the final lockdown.
Tools and Safety Gear You Will Need
Creating a bespoke home simulator requires the right equipment. You will need a specific set of tools to ensure the job is done correctly:
- Stud finder: To locate the center of your ceiling joists.
- Power drill: For driving heavy-duty lag bolts into wood.
- Level: To ensure your image isn't tilted.
- Steady ladder: For safe access to your ceiling.
Always have a second person available to help you lift the projector. Balancing on a ladder while holding expensive electronics is a safety risk you don't need to take. A partner can hold the weight while you guide the bracket into place. For a turnkey finish, focus on cable management. Use zip ties or built-in channels to hide power cords and HDMI cables. This keeps your space looking clean and sophisticated, rather than cluttered with wires. It's the small details that define an elite installation.
Final Calibration and Locking It Down
Once the projector is hanging, turn it on and display a grid pattern. Most modern projectors have this built-in setting. Align the lines of the grid with the edges of your impact screen. If you are using a high-end system like the V-Track overhead golf launch monitor, you already understand the value of precision. Adjust the projector mounts until the image is perfectly centered and flat. When the alignment is perfect, use your tools to tighten every bolt firmly. This set-it-and-forget-it method ensures your calibration stays perfect even after months of heavy use. Ready to build? Browse our full range of professional projector mounts.
Secure Your Vision and Perfect Your Swing
Building your dream setup starts with a solid foundation. You've learned that the right hardware keeps your image steady and protects your investment from vibration. Whether you choose a ceiling or wall placement, your goal is a seamless view that lets you focus on your game. High-quality projector mounts are the secret to a professional, turnkey experience in your own home.
We've done the hard work for you by selecting 47+ premium mounts that are in stock and ready to ship. Every model in our shop has been expert-tested for golf simulator stability to ensure it handles the unique needs of a high-impact environment. We offer fast shipping across the United States so you can start practicing without delay. Your journey to mastery begins with equipment that performs as well as you do.
This pursuit of mastery through high-quality equipment often translates to other precision-based skills. For individuals who also focus on tactical accuracy and want to learn more, Axle Targets offers premium, American-made training solutions to help you reach your proficiency goals.
Shop Our Curated Collection of Professional Projector Mounts
It's time to bring the course to your living room. You have the knowledge to make a great choice; we're here to help you cross the finish line and enjoy an unrivaled golfing experience.
Frequently Asked Questions
Will a universal mount fit my specific projector model?
Most universal mounts fit nearly any projector because they have adjustable arms. These metal arms move to reach the 3 or 4 screw holes on the bottom of your device. Since 95 percent of home projectors follow these standard patterns, a universal option is a safe, bespoke choice for your setup. It provides a seamless look while keeping your elite equipment secure and steady.
Can I install a projector mount into a drop ceiling?
You can install a projector mount into a drop ceiling if you use a specialized structural ceiling plate. You shouldn't attach the mount directly to the thin tiles because they'll break. Instead, a metal plate sits above the 2 foot by 2 foot tile and connects to the real ceiling. This creates a professional, turnkey finish that keeps your elite equipment hidden and safe without damaging your home.
How much weight can a standard projector mount hold safely?
A standard projector mount safely holds between 35 and 50 pounds. While a typical golf simulator projector weighs about 15 pounds, high-end 4K models can reach 25 pounds or more. You should always check that your mount's weight rating is at least 10 percent higher than your projector's actual weight. This ensures a stable, unrivaled viewing experience without any risk of the metal bracket sagging over time.
Do I need a special mount for a 4K laser projector?
You don't need a unique type of technology, but 4K laser projector mounts must be heavy duty to handle the extra weight. Laser projectors are often 20 percent heavier than older lamp versions due to their advanced cooling systems. Choosing a premium, sturdy mount ensures your 4K image stays perfectly still. This stability is vital for maintaining the precise data accuracy required for a professional golf simulation.
What happens if my ceiling is slanted or vaulted?
If your ceiling is slanted, you'll need to add a vaulted ceiling adapter to your mounting kit. These adapters allow the mount to hang straight down even on a 45 degree angle. It's a simple part that replaces the flat plate. This bespoke solution ensures your projector stays level, which is necessary for a clear, rectangular image on your impact screen rather than a distorted shape.
Should I mount my projector before or after setting up my impact screen?
You should always mount your projector after you've fully installed your impact screen. This allows you to measure the exact distance from the screen to the lens, known as the throw distance. If you're off by even 2 inches, your image might not fit the screen perfectly. Setting the screen first ensures a seamless and elite visual experience every time you step up to the ball.
Can I use a mount to hang my projector vertically?
You shouldn't hang a standard projector vertically unless the manufacturer specifically says it's okay. Most projectors are built to sit flat so that heat can escape through the vents properly. If you tilt it 90 degrees, the internal temperature can rise by 30 percent, which might damage the delicate electronics. Stick to a horizontal position for a reliable, turnkey golf simulator experience that lasts for years.
Find similar articles:
projector mounts